What is Weathering Diecast Models
Weathering diecast models is the art of adding realistic wear and tear effects to miniature vehicles. It’s a process of simulating the effects of exposure to the elements, such as sun, rain, dust, and rust, to make a model appear more authentic. This technique goes beyond simple painting, adding depth, character, and a sense of realism that transforms a pristine model into a convincing representation of a vehicle that has seen action or endured the test of time. It is a key technique for model enthusiasts aiming for accurate reproductions of real-world vehicles, offering a satisfying way to personalize and elevate their models. The goal is to replicate the visual imperfections that accumulate on real vehicles, making them look used and adding a narrative to each model.
Why Weather Diecast Models
Weathering enhances the realism of diecast models significantly. A factory-fresh model often looks too perfect, lacking the details and imperfections that make real-world vehicles unique. Weathering adds those subtle details: faded paint, rust, dust accumulation, and grime buildup. These elements tell a story, suggesting where the model has been and what it has experienced. It also allows for creative expression and personalization. You can tailor the weathering to match a specific vehicle, a particular time period, or a certain environment, such as a desert or a muddy battlefield. This process turns a collectible into a unique work of art, reflecting your skill and vision. Weathering helps to breathe life into static models, making them more engaging and visually appealing.
Benefits of Weathering Models

The benefits of weathering diecast models extend beyond just aesthetic improvements. Weathering is a rewarding hobby that combines creativity with technical skill. It provides an opportunity to learn about real-world vehicle conditions and apply that knowledge to your models. You gain expertise in various painting techniques, such as washes, dry brushing, and chipping, and you develop problem-solving skills. Weathering also fosters a strong sense of accomplishment as you transform a simple model into a detailed masterpiece. It’s a way to connect with a community of fellow enthusiasts, share techniques, and appreciate each other’s work. Weathering offers a therapeutic escape, allowing you to focus on a creative project and achieve a tangible result. It can also significantly increase the value of your models, particularly if they are well-weathered and authentically detailed.
Essential Tools for Weathering
Paint and Supplies
The choice of paints and supplies is critical for successful weathering. Acrylic paints are the most popular choice due to their ease of use, quick drying times, and low odor. You’ll need a range of colors including earth tones (browns, tans, and ochers) for dirt and rust, grays and blacks for shadows and grime, and a variety of colors for specific effects like chipped paint. Consider specialized weathering products, such as washes and pigments, which are designed to create specific effects with ease. Washes are thin, pre-mixed paints used to highlight details, while pigments are finely ground powders that simulate dust and rust. Also, have a good selection of thinners or mediums to dilute your paints for washes and other techniques. Always invest in quality paints and products to achieve the best results.
Brushes and Applicators

The right brushes and applicators are essential for applying weathering effects. You’ll need a variety of brushes: small, fine-tipped brushes for detail work, larger brushes for applying washes and dry brushing, and even stippling brushes for creating textured effects. Synthetic brushes are often preferred for acrylics because they are durable and easy to clean. Consider using a dedicated brush cleaner to maintain your brushes and keep them in good condition. In addition to brushes, consider using applicators like sponges, cotton swabs, and makeup sponges to apply paints and create textures. These tools are great for creating rust effects or simulating mud and dirt. Investing in a selection of different applicators allows you to explore a variety of techniques.
Airbrush vs. Hand Painting
Airbrushing offers advantages for weathering, allowing you to apply thin, even coats of paint and create subtle effects. It is particularly useful for applying washes, shadows, and highlighting large areas. However, hand painting is equally valid and often preferred for detail work and applying specific weathering techniques like dry brushing and chipping. Many modelers use a combination of both techniques. Airbrushes can be more expensive and require more setup and maintenance, whereas hand painting is accessible with simple tools. Ultimately, the best approach depends on your experience, the complexity of the project, and the desired level of detail. Experimenting with both methods will help you determine which suits your needs.
Preparation of Diecast Models for Weathering
Cleaning and Surface Prep

Cleaning is the first crucial step in preparing a diecast model for weathering. Use warm, soapy water and a soft brush to remove any dirt, dust, or oils from the model’s surface. Rinse thoroughly and let it dry completely. For older models, you may need to use a gentle degreaser. Once cleaned, inspect the surface for imperfections and seams. Depending on the extent of weathering you plan to do, you may need to lightly sand the surface to improve paint adhesion. Using fine-grit sandpaper will help create a smooth surface. Proper surface preparation ensures that the weathering effects adhere properly and that your work looks professional. Take your time and don’t rush this important step.
Disassembly if needed
Disassembling your diecast model, when possible, can make the weathering process significantly easier and more effective. Remove parts such as wheels, mirrors, and other accessories to allow access to hard-to-reach areas. This also helps prevent paint from accumulating in unwanted places. Take photos or make notes as you disassemble to ensure you can reassemble the model correctly. Use the correct tools to avoid damaging the delicate parts. Disassembly allows you to apply weathering effects to individual parts, such as the chassis and wheels, before reassembling the model. This approach provides greater control and allows you to achieve more detailed and realistic weathering.
Primer Application
Applying a primer is a crucial step in preparing a diecast model for weathering. Primer creates a uniform surface and improves paint adhesion. Choose a primer specifically designed for plastic or metal models. Apply the primer in thin, even coats, allowing each coat to dry before applying the next. This prevents runs and pooling. If the primer is too thick, it may obscure the model’s details. Gray or black primers are common choices, as they provide a good base for subsequent weathering effects. Once the primer is dry, you can lightly sand any imperfections. Priming ensures that your weathering effects are durable and that the colors are true and vibrant. It is an essential step for achieving professional-looking results.
Basic Weathering Techniques

Washing and Pin-Washing
Washing and pin-washing are essential techniques for adding depth and highlighting details. A wash is a thin, translucent layer of paint that settles into recesses and crevices, creating shadows and emphasizing details. Apply the wash generously to the model’s surface, allowing it to flow into the panel lines and around raised details. After a few minutes, use a clean brush or cotton swab to remove the excess wash from the flat surfaces, leaving it in the recesses. Pin-washing is a more precise technique where you apply the wash directly to the details using a fine-tipped brush. Use different colors of washes to achieve varying effects, such as highlighting engine details or adding a rusty look to the panel lines. These techniques are fundamental for creating realistic shadows and enhancing the visual interest of your model.
Dry Brushing
Dry brushing is a simple yet effective technique for adding highlights and simulating wear and tear. Dip a dry brush into paint, then wipe off most of the paint onto a paper towel until the brush is nearly dry. Gently brush the bristles across the raised details and edges of the model. The remaining paint will catch on these surfaces, highlighting them and creating the illusion of wear. Use different colors for highlighting different areas, like metallic paints for edges and corners. Dry brushing is great for simulating paint chipping, adding texture to surfaces, and creating a sense of age and use. Vary the pressure and the amount of paint on the brush to achieve different effects. Experiment with different colors to add subtle or dramatic touches.
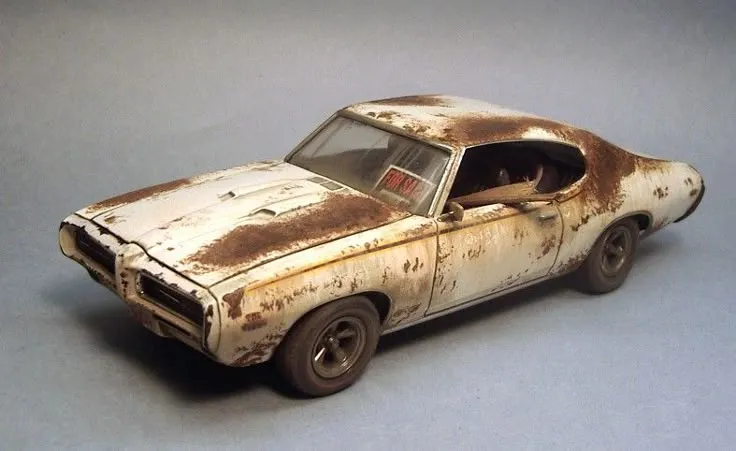
Applying Rust and Grime

Simulating rust and grime adds a significant level of realism. Use a combination of techniques to create these effects, starting with a base coat of rust-colored paint. Apply washes and dry brushing with rust-colored paints to create depth and texture. Use pigment powders for a more realistic rusty look. Apply the pigment powders with a brush and fix them in place with a matte varnish or a pigment fixer. To simulate grime, mix dark brown or black paint with a small amount of water or thinner and apply it to areas where dirt and oil would accumulate, such as around engine compartments, exhaust pipes, and lower body panels. Vary the intensity and placement of the rust and grime to create a convincing impression of age and environmental exposure.
Advanced Weathering Techniques
Adding Chipping Effects
Creating chipping effects adds a layer of realism that simulates paint damage from use. There are several ways to achieve this. One method involves using a fine brush and a small amount of contrasting color to simulate chips. Carefully paint small dots and lines on edges and corners where the paint would likely chip. Another approach is to use chipping fluid, applied before the base coat. After the base coat dries, lightly rub the surface with a brush or a toothpick to reveal the primer or the original paint color. Sponge weathering is another effective method for large areas. Dip a small piece of sponge into paint and gently dab it on the model’s surface. This creates a random, uneven texture that simulates chipped paint. Experiment with different techniques to find what works best for your models.
Using Weathering Powders

Weathering powders offer a versatile way to add realistic effects such as dust, dirt, and rust. These finely ground pigments come in various colors and can be applied directly to the model’s surface using a brush or applicator. Apply the powders in layers to build up desired effects, such as creating a dusty appearance. You can blend the powders using a dry brush. To create a rust effect, apply rust-colored powders around the areas where rust typically forms, like the wheels and exhaust pipes. Once you are satisfied with the effects, fix the powders with a matte varnish or a pigment fixer to prevent them from rubbing off. Experiment with different colors and combinations to achieve a realistic look.
Creating Streaks and Stains
Creating streaks and stains simulates the effects of rain, oil, and other fluids. Use thinned paint or specialized weathering products to achieve this. Apply the paint in vertical streaks, starting from the top of the model and working downwards. Allow the paint to run naturally, creating the look of water or oil running down the surface. You can also use a fine brush to create more controlled streaks. Adjust the color and opacity of the paint to match the type of stain you want to create. Oil stains, for example, might require a darker, more opaque paint. Work in small sections and remove excess paint with a clean brush or cotton swab to maintain control. These techniques add an extra layer of realism and detail to your model.
Finishing and Sealing
Sealing the Weathering
Sealing your weathering work protects it from damage and ensures its longevity. After you’ve applied all your weathering effects, use a matte varnish to seal the entire model. This will help to protect the paint and pigments, and it will also give the model a more realistic appearance. Apply the varnish in thin, even coats, and allow each coat to dry completely before applying the next. Avoid over-applying varnish, as this can obscure the details. Gloss or satin varnishes can be used to highlight specific areas, such as windows or chrome parts. Sealing the model not only preserves your work but also helps to blend all of the weathering effects together, making the model look more cohesive.
Displaying and Protecting Your Work
Displaying and protecting your weathered diecast models is essential for preserving your work. Choose a display area that protects your models from direct sunlight and dust. Consider using display cases to protect your models from dust and accidental damage. Regular dusting with a soft brush or cloth will help to keep your models clean. Store your models in a cool, dry place if they are not on display. For added protection, consider using a UV-resistant display case to prevent fading. By taking these precautions, you can ensure that your weathered diecast models remain in excellent condition for years to come, showcasing your skills and passion for the hobby. Share your models with fellow enthusiasts and enjoy the fruits of your labor.