Understanding Diecast Car Replacement Parts
Diecast car collecting is a passionate hobby, and maintaining the pristine condition of your models is a key part of it. Over time, these miniature marvels can suffer damage, whether from accidents, wear and tear, or simply the passage of time. This is where diecast car replacement parts come into play, allowing collectors to restore their prized possessions to their original glory. Understanding the types of parts available, how to find them, and the tools needed for the job is essential for any serious enthusiast. This guide will delve into the world of diecast car replacement parts, offering tips and insights to help you keep your collection in top shape. By learning about common replacement needs and sourcing the correct components, you can ensure your models remain valuable and visually appealing for years to come. The joy of restoring a beloved model is a rewarding aspect of the hobby, and with the right knowledge, it’s a skill anyone can master.
Common Diecast Car Parts That Need Replacement
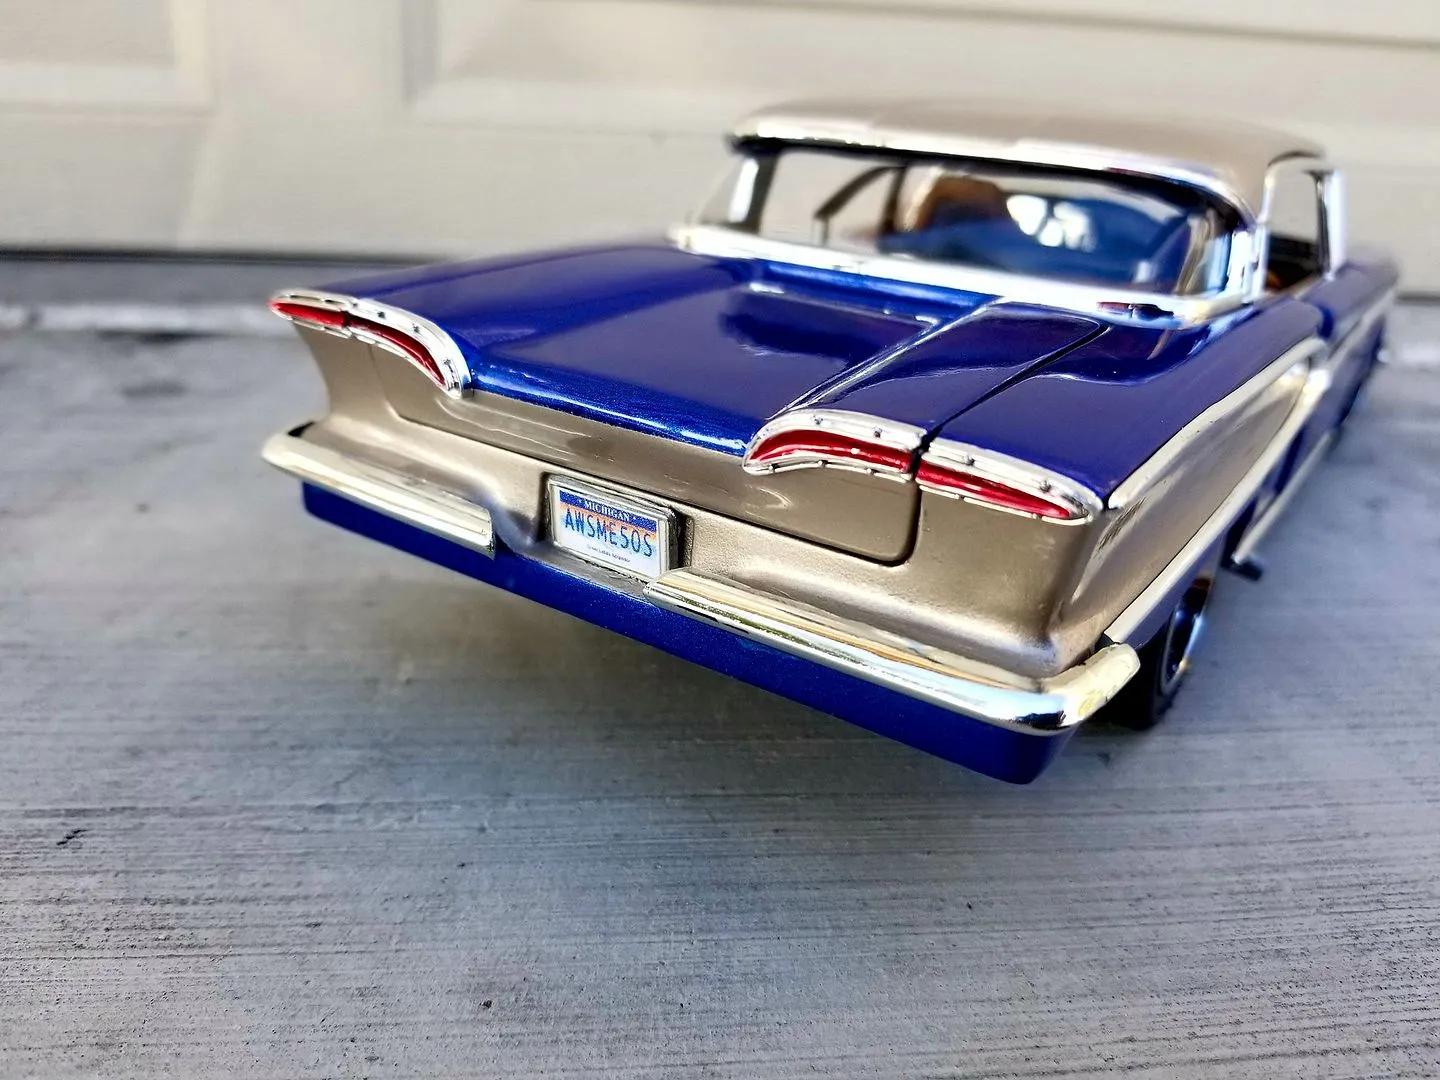
Several components on a diecast car are prone to damage or wear, making them common candidates for replacement. These parts can often be found separately, allowing for targeted repairs and restoration efforts. Identifying the specific part that needs attention is the first step in the repair process. Knowing where to look for these parts, whether online or at specialist shops, will help you restore your models to their original state. Common issues include broken or missing wheels and tires, which can impact the car’s rolling ability and visual appeal. Scratched or cracked windows and mirrors detract from the model’s realism, while damage to the body or chassis can affect its structural integrity and overall appearance. Replacement parts often come in a variety of materials, and selecting the correct material will ensure an authentic restoration. Whether it is replacing a simple wheel or a complex body panel, understanding these common replacement needs will improve your restoration skills.
Wheels and Tires

Wheels and tires are among the most frequently replaced parts on diecast cars. These components can be damaged through rough handling, accidents, or simply due to the aging of materials. Replacing wheels and tires can significantly improve the car’s appearance and functionality, restoring its ability to roll smoothly. When selecting replacement wheels and tires, it’s crucial to match the original specifications. This involves considering the diameter, width, and material of the wheels, as well as the design and tread pattern of the tires. Matching the original specifications will help preserve the model’s authenticity. The availability of these parts makes it easier to restore a diecast car to its original look. Many suppliers offer sets or individual components, catering to a wide range of models and scales. Correct wheel and tire selection is a key element of any successful diecast car restoration project.
Body and Chassis
The body and chassis of a diecast car are vulnerable to damage from impacts, drops, or improper storage. Dents, scratches, and broken components can detract significantly from the model’s visual appeal. Replacing body parts can be a more complex task than replacing wheels, often involving disassembly and reassembly of the car. This process requires careful attention to detail to avoid further damage. Chassis damage can affect the car’s structural integrity and rolling performance, and replacements may be required. It’s often necessary to source specific parts that match the model’s make, scale, and style. Sourcing the right parts will ensure an authentic restoration that preserves the car’s value and visual appeal. Whether dealing with a minor scratch or a significant structural issue, replacing body and chassis parts requires patience and the right tools.
Windows and Mirrors
Windows and mirrors are delicate components that are easily damaged. Scratches, cracks, or complete breakage can occur due to mishandling or accidents. Replacing these parts is essential for restoring the car’s realism and preserving its value. Many replacement windows and mirrors are available, often made from clear plastic or glass, designed to match the original specifications. Precise cutting and fitting may be needed, along with appropriate adhesives to secure the new parts. Careful installation is critical to prevent further damage. For intricate models, replacements can sometimes be challenging, requiring specialized tools or techniques. When choosing replacement parts, ensure they are compatible with the car’s make and scale. Attention to detail during installation is essential, helping maintain the integrity and the authentic look of the diecast model. Replacing these components can dramatically improve the car’s overall presentation.
Finding the Right Replacement Parts

Finding the correct replacement parts is crucial for a successful diecast car restoration. The process involves several steps, including identifying the model and scale, researching reputable suppliers, and verifying the compatibility of the replacement parts. The availability of the right components makes the difference between a successful restoration and an incomplete project. It is important to take the time to gather as much information as possible about the model. Knowing the exact make, model, and scale of the diecast car is the first step in the process. From the information you find, you can track down the exact parts you need. Searching online marketplaces, specialist stores, and model car forums can help you find the parts you need. Careful research will help prevent costly mistakes, allowing you to restore your diecast car to its original beauty.
Identify the Model and Scale
Accurately identifying the model and scale of your diecast car is the foundation for sourcing the correct replacement parts. Diecast cars come in various scales, such as 1:18, 1:24, and 1:43, and each scale has specific part dimensions. Check the car’s base for markings that indicate the model and scale. These details are essential for matching replacement parts. For less detailed models, you might need to measure the car’s dimensions and compare them to known scales. Taking careful measurements of the existing parts can also help in finding the best replacement. Accurate model identification ensures that you get the right size and fit, improving the chances of a successful restoration. Before beginning a restoration project, make sure to identify and verify the model and its scale.
Research Reputable Suppliers
Selecting reputable suppliers is essential for ensuring the quality and compatibility of your diecast car replacement parts. Look for suppliers with positive customer reviews, a wide selection of parts, and clear product descriptions. Online marketplaces, specialty shops, and model car clubs are good places to start your search. Suppliers that specialize in diecast car parts will often have the best inventory and expertise. Check for detailed photos, measurements, and descriptions of the parts to make sure they match your requirements. Check the supplier’s return policy. This will protect you if the parts are the wrong size or have defects. Consider the supplier’s shipping costs and delivery times before ordering. Researching suppliers and selecting those that you can trust is an important step in the restoration process, ensuring a successful and satisfying project.
Check for Compatibility

Before purchasing replacement parts, always verify their compatibility with your diecast car model. This involves comparing the measurements, materials, and design of the replacement part to the original components. If possible, compare the replacement part with the original. Ensure that the mounting points, screw holes, and overall shape match. Check the materials to ensure they align with the original components. For example, if the original part was made of metal, the replacement part should also be made of metal. If using aftermarket parts, always read product descriptions and customer reviews. Thoroughly checking for compatibility prevents buying incorrect parts and helps avoid frustration. A successful restoration depends on selecting compatible replacement parts. Taking the time to verify the compatibility will save time and effort.
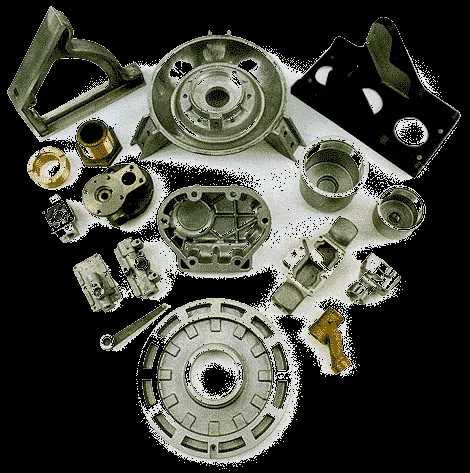
Tools and Materials for Replacement
Having the right tools and materials is essential for any diecast car replacement project. The tools you will need will depend on the complexity of the repairs, but having a basic set will allow you to address a wide range of issues. Investing in quality tools and materials will make the process easier and the results better. From basic hand tools to specialized equipment, the tools will vary. Adhesives and paints also play an important role. Here is a breakdown of the tools and materials you will need to successfully restore your models.
Basic Tools for Part Replacement
A basic toolkit for diecast car repairs should include several essential items. Small screwdrivers, both flathead and Phillips head, are needed for removing and replacing screws. Tweezers and needle-nose pliers are useful for handling small parts. A hobby knife or craft knife is handy for cutting and trimming. A set of files and sandpaper is used for preparing surfaces and smoothing edges. A magnifying glass can help with seeing small details and can be extremely useful. It’s important to have a work surface that protects the car from scratches and damage. A well-equipped toolkit will allow you to handle most simple repairs with ease. Ensure that your tools are in good condition and stored properly to extend their lifespan.
Adhesives and Paints

Selecting the right adhesives and paints is crucial for a professional-looking finish. For bonding parts, use a strong, fast-drying adhesive designed for plastics or metals. Epoxy or super glue can be used to reattach broken components. For painting, use high-quality model paints that match the original colors. Acrylic paints are a good choice due to their ease of use and wide range of colors. A fine-tipped brush or airbrush will help you achieve a smooth finish. Always prepare the surface by cleaning and priming before applying paint. This will ensure that the paint adheres properly and lasts longer. Choosing the right adhesives and paints is essential for your diecast car restoration project. The end result will be a restored car that is beautiful and matches the original appearance.
Step-by-Step Replacement Guide
The process of replacing diecast car parts involves careful planning and execution. Each replacement project will be a little different depending on the parts you are replacing. However, some general guidelines apply. Understanding the steps involved, from disassembly to reassembly, is crucial for achieving successful outcomes. Careful attention to detail and a methodical approach will help to prevent damage to the model and ensure a professional finish. Whether you are a beginner or experienced modeler, these guidelines will help you to replace parts. By following this step-by-step guide, you can increase your confidence and skill. The joy of restoring your models will come from following these steps.
Replacing Wheels and Tires
Replacing wheels and tires typically involves the following steps: First, carefully remove the old wheels and tires from the axle, usually by gently prying them off or unscrewing them. If the wheels are glued, you might need to use a solvent to soften the adhesive. Next, clean the axle and prepare it for the new wheels. Ensure that the new wheels and tires match the original specifications. Carefully attach the new wheels and tires to the axle, ensuring they are securely fitted. If gluing, apply the adhesive sparingly. Once attached, make sure the wheels roll smoothly and do not rub against the chassis or body. Check that the new tires are correctly aligned and provide a good fit. Replacing wheels and tires is one of the most common diecast car repairs and with the right tools and approach, it’s a straightforward task.
Attaching Body Parts

Attaching body parts involves careful disassembly, precise alignment, and secure bonding. First, carefully detach the damaged part from the body. Clean the areas where the new part will attach. Using appropriate adhesives, apply a small amount to the connection points. Carefully align the new part with the body, ensuring proper fit and alignment. Hold the parts together until the adhesive sets completely. For more complex body parts, you may need to use clamps or tape to hold the parts in place. Check for any gaps or misalignment, and make necessary adjustments. Ensure that the new part is securely attached and that the car’s overall appearance is restored. This process requires patience and precision. Success depends on careful preparation and correct adhesion, so take your time to achieve the desired result.
Tips for Maintaining Your Diecast Cars
Taking care of your diecast car collection is essential for preserving their value and beauty. Regular maintenance, proper storage, and protection against damage are key. By implementing these practices, you can protect your investment and enjoy your collection for many years. Simple steps can make a big difference. Regularly cleaning your models, storing them in a cool, dry place, and protecting them from sunlight and dust are all essential practices. These strategies will not only improve the longevity of your models, but also maintain the condition. By practicing routine maintenance, you can enjoy the hobby of diecast car collecting and keep your models in pristine condition.
Cleaning and Storage
Regular cleaning and proper storage are fundamental to maintaining the quality of your diecast cars. Dust and grime can accumulate on the models over time, potentially damaging the paint and other delicate parts. Using a soft cloth or a specialized brush, gently dust the models regularly. Avoid using harsh chemicals or abrasive materials that could scratch the surface. Store your diecast cars in a cool, dry place away from direct sunlight and excessive heat. Consider using display cases or individual boxes to protect your models from dust, scratches, and accidental damage. Organizing your collection will also help to maintain its appeal. Routine cleaning and effective storage are essential for preserving the quality and value of your diecast car collection.
Protecting Against Damage
Protecting your diecast cars against damage is a significant part of preserving their condition. Consider protecting your models from accidents. Store them in protective cases or display them in areas where they are not exposed to accidental drops or impacts. Avoid exposing your models to extreme temperatures or direct sunlight. The sun can fade the paint and damage the materials. Handling your models with clean hands can prevent dirt and oils from transferring to the surface. Consider investing in insurance that covers accidental damage or loss. Protect your models from dust and dirt by using display cases with airtight seals. By following these practices, you can protect your diecast car collection and continue to enjoy them for years to come.